> ## Documentation Index
> Fetch the complete documentation index at: https://docs.binarly.io/llms.txt
> Use this file to discover all available pages before exploring further.
# Setup API Client
Set up Machine-to-Machine (M2M) authentication for automated integrations and CI/CD pipelines.
## SaaS Customers
**Request Required** SaaS customers cannot create M2M credentials themselves. Contact [support@binarly.io](mailto:support@binarly.io) to request API credentials for your organization.
When contacting support, please provide:
* Your organization name
* Intended use case (CI/CD, automation, integration)
* Any specific permission requirements
You will receive:
* **Client ID** - Your API client identifier
* **Client Secret** - Your secure API key
* **Auth URL** - Your authentication endpoint
Once you receive your credentials, proceed to [M2M Authentication](/api-reference/authentication/get-m2m-token).
## On-Premises Customers
On-Premises customers have full access to Keycloak and can create API clients directly.
### Step 1: Navigate to Keycloak
1. Open your Keycloak Admin Console: `https:///admin`
2. Click on **Administration Console** to log in with your administrator credentials.
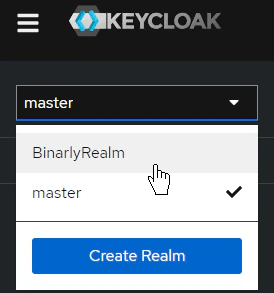
 ### Step 2: Select Realm
From the dropdown menu in the top-left corner, select **BinarlyRealm** (or your organization's designated realm).
### Step 2: Select Realm
From the dropdown menu in the top-left corner, select **BinarlyRealm** (or your organization's designated realm).
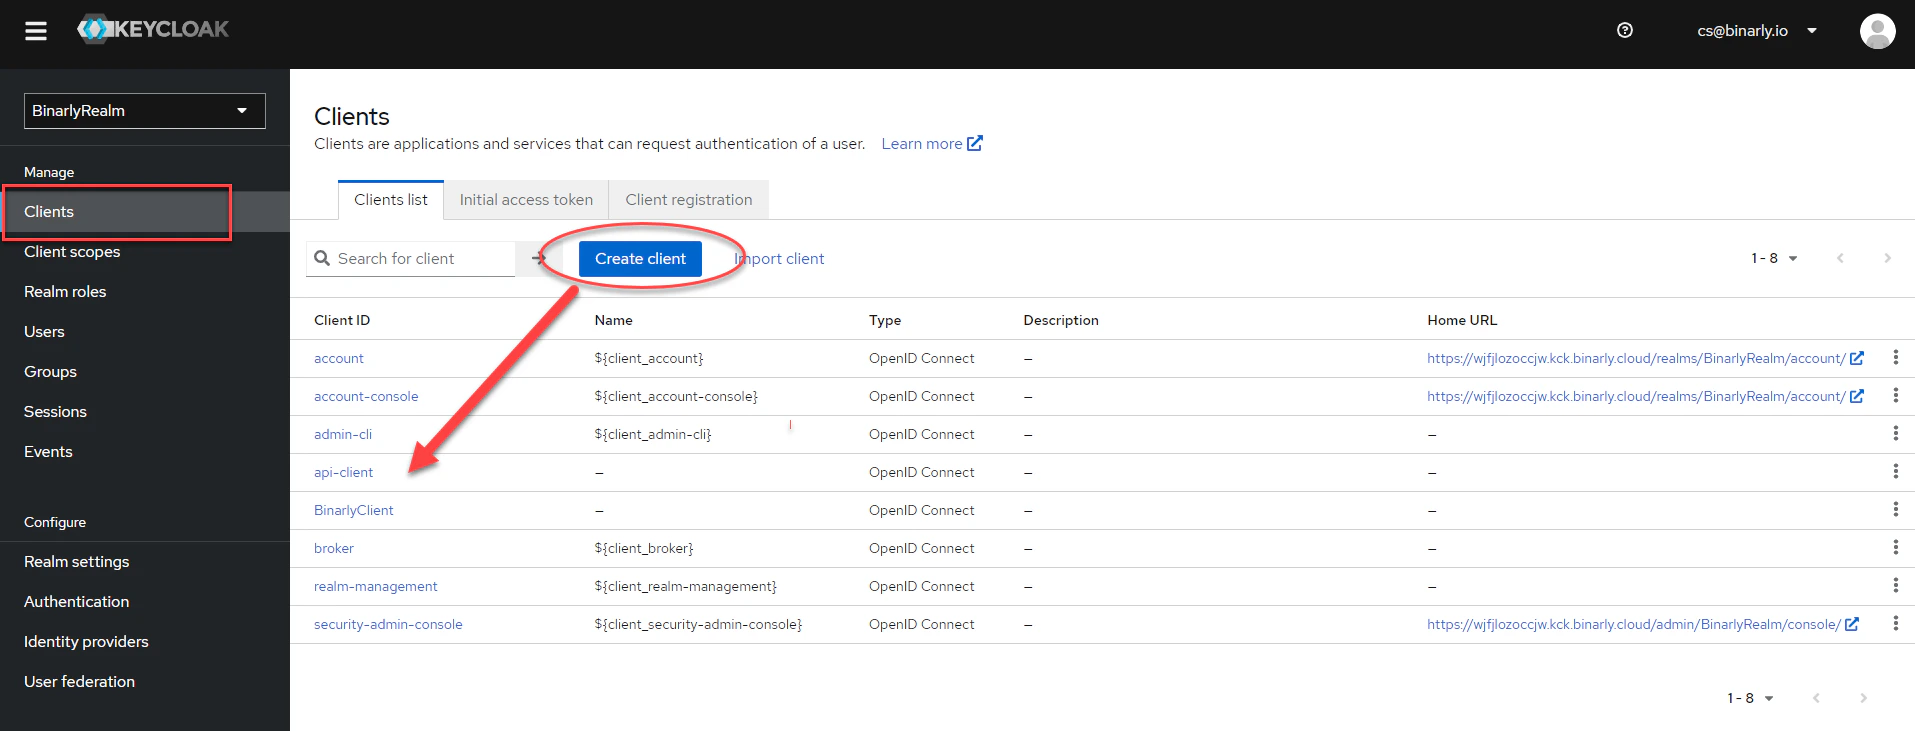
 ### Step 3: Create a Client
1. Select **Clients** from the left-hand menu.
2. Click **Create client**.
### Step 3: Create a Client
1. Select **Clients** from the left-hand menu.
2. Click **Create client**.
 #### General Settings
* **Client type**: OpenID Connect
* **Client ID**: Enter a descriptive ID (e.g., `api-client` or `ci-cd-automation`).
* **Name**: (Optional) Enter a friendly name.
#### General Settings
* **Client type**: OpenID Connect
* **Client ID**: Enter a descriptive ID (e.g., `api-client` or `ci-cd-automation`).
* **Name**: (Optional) Enter a friendly name.
 Click **Next**.
#### Capability Config
* **Client authentication**: **On** (This enables Client Credentials).
* **Authorization**: Off (unless specifically required).
* **Authentication flow**:
* Uncheck "Standard flow", "Direct access grants", etc.
* Ensure **Service accounts roles** is **Checked**.
Click **Next**.
#### Capability Config
* **Client authentication**: **On** (This enables Client Credentials).
* **Authorization**: Off (unless specifically required).
* **Authentication flow**:
* Uncheck "Standard flow", "Direct access grants", etc.
* Ensure **Service accounts roles** is **Checked**.
 Click **Next** and then **Save**.
### Step 4: Obtain Credentials
1. After saving, select the **Credentials** tab at the top of the client details page.
2. Copy the **Client Secret**. This is your secure key for API access.
Click **Next** and then **Save**.
### Step 4: Obtain Credentials
1. After saving, select the **Credentials** tab at the top of the client details page.
2. Copy the **Client Secret**. This is your secure key for API access.
 >
> Store this secret securely. If lost or compromised, regenerate it immediately using the "Regenerate" button on this page.
>
## Next Steps
Now that you have your Client ID and Secret, you are ready to generate an access token.
[Go to M2M Authentication ->](/api-reference/authentication/get-m2m-token)
>
> Store this secret securely. If lost or compromised, regenerate it immediately using the "Regenerate" button on this page.
>
## Next Steps
Now that you have your Client ID and Secret, you are ready to generate an access token.
[Go to M2M Authentication ->](/api-reference/authentication/get-m2m-token)