> ## Documentation Index
> Fetch the complete documentation index at: https://docs.binarly.io/llms.txt
> Use this file to discover all available pages before exploring further.
# Remediate Vulnerabilities
We're going to discover and fix a potential 0-day using the BTP platform. As an example, we're going to use a UEFI SMM driver that is vulnerable to an arbitrary code execution bug. The code is available to follow along.
## Preparing the example
Our test case is a UEFI driver that stores arbitrary data in SMRAM but has a fatal flaw that allows an attacker to trick SMM into executing any function. The driver consists of two files: `ExampleSmmStore.c`, and `ExampleSmmStore.inf`. To build a UEFI image with the driver inside, we'll need EDK II and then add a new folder with the driver's code to the OVMF package. First, clone the edk2 repository from GitHub and copy the driver's files into a new folder like this:
Check your operating system and install the required [tools](https://github.com/tianocore/tianocore.github.io/wiki/Getting-Started-with-EDK-II).
```bash theme={null}
git clone --recurse-submodules https://github.com/tianocore/edk2.git
```
```bash theme={null}
cd edk2 && source edksetup.sh && make -C BaseTools
```
```bash theme={null}
mkdir OvmfPkg/ExampleSmmStore
```
Create a new file named `ExampleSmmStore.c` in the `OvmfPkg/ExampleSmmStore` directory.
```c theme={null}
#include
#include
#include
#include
#include
#include
#include
#include
#include
#include
#include
#include
#include
#include
#include
// EFI_EXAMPLE_SMM_STORE_SMM_COMMUNICATION_GUID =
// 22868f89-7cb2-4e90-b4ac-5582532135a9
EFI_GUID gEfiExampleSmmStoreCommunicationGuid = {
0x22868f89,
0x7cb2,
0x4e90,
{0xb4, 0xac, 0x55, 0x82, 0x53, 0x21, 0x35, 0xa9}};
VOID *gBuffer = NULL;
EFI_STATUS
EFIAPI
ExampleSmmStoreHandler(IN EFI_HANDLE DispatchHandle,
IN CONST VOID *Context OPTIONAL,
IN OUT VOID *CommBuffer OPTIONAL,
IN OUT UINTN *CommBufferSize OPTIONAL) {
EFI_STATUS Status;
//
// If input is invalid, stop processing this SMI
//
if ((CommBuffer == NULL) || (CommBufferSize == NULL) ||
(*CommBufferSize == 0)) {
return EFI_SUCCESS;
}
if (gBuffer) {
Status = gBS->FreePool(gBuffer);
if (EFI_ERROR(Status)) {
DebugPrint(DEBUG_INFO, "Failed to free buffer\n");
return Status;
}
gBuffer = NULL;
}
Status =
gBS->AllocatePool(EfiBootServicesData, *CommBufferSize, (VOID *)&gBuffer);
if (EFI_ERROR(Status)) {
DebugPrint(DEBUG_INFO, "Failed to allocate buffer\n");
return Status;
}
CopyMem(gBuffer, CommBuffer, *CommBufferSize);
return EFI_SUCCESS;
}
EFI_STATUS
EFIAPI
ExampleSmmStoreEntryPoint(IN EFI_HANDLE ImageHandle,
IN EFI_SYSTEM_TABLE *SystemTable) {
EFI_STATUS Status;
EFI_HANDLE DispatchHandle;
//
// Register ExampleSmmStore communication handler
//
Status = gMmst->MmiHandlerRegister(ExampleSmmStoreHandler,
&gEfiExampleSmmStoreCommunicationGuid,
&DispatchHandle);
ASSERT_EFI_ERROR(Status);
if (EFI_ERROR(Status)) {
DEBUG((DEBUG_ERROR, "Failed to register ExampleSmmStoreHandler: %r!\n",
Status));
}
return Status;
}
```
Create a new file named `ExampleSmmStore.inf` in the `OvmfPkg/ExampleSmmStore` directory.
```
[Defines]
INF_VERSION = 0x00010005
BASE_NAME = ExampleSmmStore
FILE_GUID = E56DDE0D-F510-40E1-A575-201B9BA81D1F
MODULE_TYPE = DXE_SMM_DRIVER
VERSION_STRING = 1.0
ENTRY_POINT = ExampleSmmStoreEntryPoint
PI_SPECIFICATION_VERSION = 0x00010400
[Sources]
ExampleSmmStore.c
[Packages]
MdeModulePkg/MdeModulePkg.dec
MdePkg/MdePkg.dec
OvmfPkg/OvmfPkg.dec
[LibraryClasses]
MmServicesTableLib
SmmMemLib
UefiDriverEntryPoint
UefiLib
[Protocols]
gEfiSmmCpuProtocolGuid
gEfiSmmSwDispatch2ProtocolGuid
gEfiSmmVariableProtocolGuid
[Depex]
TRUE
```
The driver needs to be added to the OVMF package by adding the following line to `OvmfPkg/OvmfPkgX64.fdf` file in the \[FV.DXEFV] section.
```c theme={null}
INF OvmfPkg/ExampleSmmStore/ExampleSmmStore.inf
```
And the following line to the end of the file: `OvmfPkg/OvmfPkgX64.dsc`.
```c theme={null}
OvmfPkg/ExampleSmmStore/ExampleSmmStore.inf {
DebugLib|OvmfPkg/Library/PlatformDebugLibIoPort/PlatformDebugLibIoPort.inf
MemoryAllocationLib|MdePkg/Library/UefiMemoryAllocationLib/UefiMemoryAllocationLib.inf
}
```
Now we're ready to build the UEFI image with debugging symbols.
```bash theme={null}
build -p OvmfPkg/OvmfPkgX64.dsc -a X64 -t CLANGPDB -b DEBUG -D SMM_REQUIRE
```
After the build process is done, the firmware image will be at
**Build/OvmfX64/DEBUG\_CLANGPDB/FV/OVMF.fd**
```bash theme={null}
mkdir -p pdb_files && find Build -name "*.pdb" -type f -exec cp -f {} pdb_files/ \;
```
## Let's investigate the example
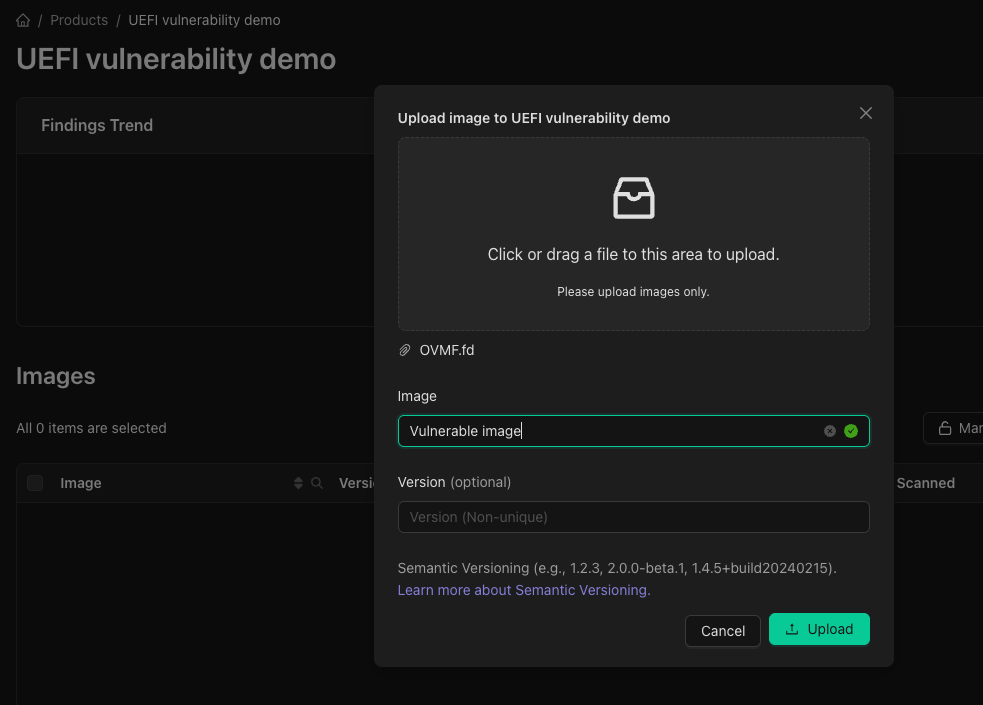
First, let's upload the firmware image to a product so we can investigate the image. Click on the **"Upload"** dialog in the product's interface. Choose our previous compiled OVMF.fd to upload, set an image name and version number. At the end hit the **"Upload"** button.
 ### Upload the debug symbols
Before we get Started, we need to upload the debug symbols for the firmware image to identify the vulnerable function. Checkout the [Upload Debug Symbols](/resource-center/debugging-symbols) guide for more information.
### Investigate the finding
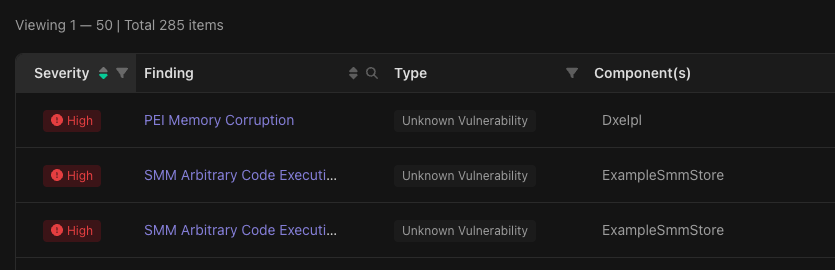
In the image findings tab should be two findings with the title SMM Arbitrary Code Execution in the ExampleSmmStore component. Clicking the first and navigating to the Details tab will reveal the decompiled code of the vulnerable function with the offending lines highlighted in red.
### Upload the debug symbols
Before we get Started, we need to upload the debug symbols for the firmware image to identify the vulnerable function. Checkout the [Upload Debug Symbols](/resource-center/debugging-symbols) guide for more information.
### Investigate the finding
In the image findings tab should be two findings with the title SMM Arbitrary Code Execution in the ExampleSmmStore component. Clicking the first and navigating to the Details tab will reveal the decompiled code of the vulnerable function with the offending lines highlighted in red.
 The highlighted lines are accompanied by comments explaining the technical details of the issue: The driver's SMI handler, which runs in SMM, uses the `AllocatePool` and `FreePool` functions from the UEFI Boot Services. Because the Boot Services code is outside of SMRAM, an attacker can replace it with their own and then call the SMI handler to trick it into executing it.
We'll ask the Binarly Transparency Platform's built-in AI assistant to help us fix the issue now by clicking the bottom right button to open a new chat window.
The highlighted lines are accompanied by comments explaining the technical details of the issue: The driver's SMI handler, which runs in SMM, uses the `AllocatePool` and `FreePool` functions from the UEFI Boot Services. Because the Boot Services code is outside of SMRAM, an attacker can replace it with their own and then call the SMI handler to trick it into executing it.
We'll ask the Binarly Transparency Platform's built-in AI assistant to help us fix the issue now by clicking the bottom right button to open a new chat window.
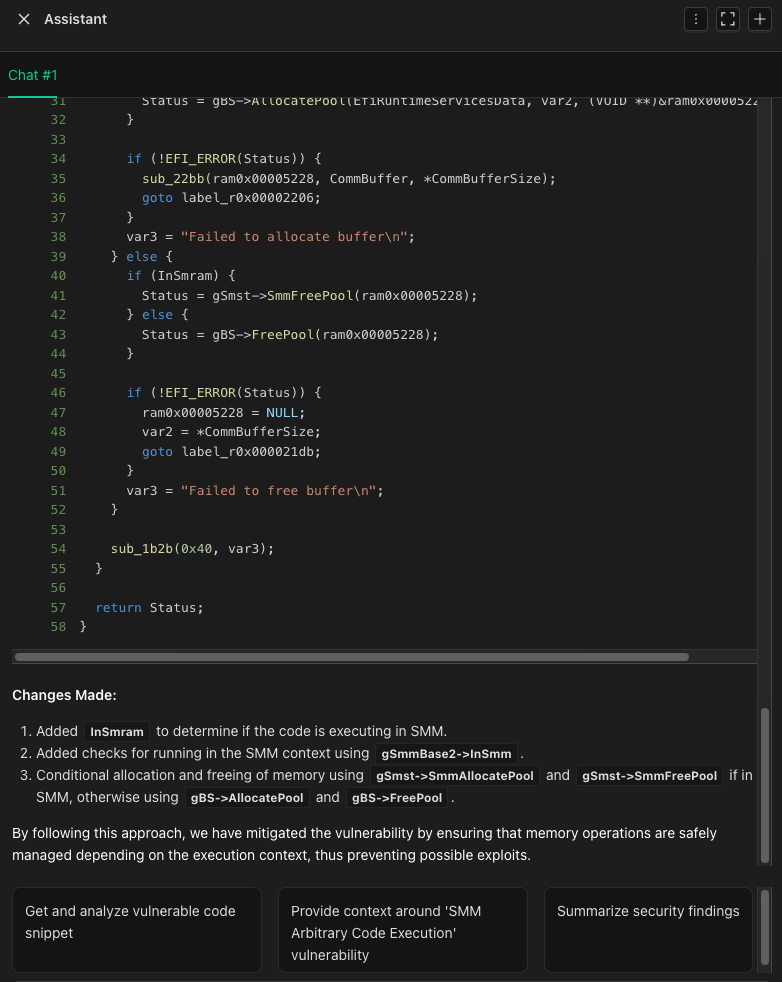 The chat window has one suggestion to analyze the vulnerable code, so we'll go with that one. AI assistant will reply with a description of the vulnerability contextualized by the decompiled code as well as a detailed breakdown of how to fix the issue. It correctly points out that using Boot Services in SMM is dangerous and that we should replace them with the SMM-equivalents provided by the `EFI_SMM_SYSTEM_TABLE`. AI assistant will produce a fixed variant of the decompiled code (see below).
```c theme={null}
EFI_STATUS
EFIAPI
ExampleSmmStoreHandler(IN EFI_HANDLE DispatchHandle,
IN CONST VOID *Context OPTIONAL,
IN OUT VOID *CommBuffer OPTIONAL,
IN OUT UINTN *CommBufferSize OPTIONAL) {
EFI_STATUS Status;
//
// If input is invalid, stop processing this SMI
//
if ((CommBuffer == NULL) || (CommBufferSize == NULL) || (*CommBufferSize == 0)) {
return EFI_SUCCESS;
}
if (gBuffer) {
Status = gBS->FreePool(gBuffer); // [!code --]
Status = gSmst->MmFreePool(gBuffer); // [!code ++]
if (EFI_ERROR(Status)) {
DebugPrint(DEBUG_INFO, "Failed to free buffer\n");
return Status;
}
gBuffer = NULL;
}
Status = gBS->AllocatePool(EfiBootServicesData, *CommBufferSize, (VOID *)&gBuffer); // [!code --]
Status = gSmst->MmAllocatePool(EfiBootServicesData, *CommBufferSize, (VOID *)&gBuffer); // [!code ++]
if (EFI_ERROR(Status)) {
DebugPrint(DEBUG_INFO, "Failed to allocate buffer\n");
return Status;
}
CopyMem(gBuffer, CommBuffer, *CommBufferSize);
return EFI_SUCCESS;
}
```
We can now go back to the driver and apply the fix AI assistant created for us. In `ExampleSmmStore.c` we're going to replace the usage of `gBS` with `gSmst` in lines 53 and 62. In the newest version of Tianocore these functions got unified under the MM framework and make use of the new function names `MmFreePool` and `MmAllocatePool`. Now we need to recompile the fixed code with the following snippet.
```bash theme={null}
build -p OvmfPkg/OvmfPkgX64.dsc -a X64 -t CLANGPDB -b DEBUG -D SMM_REQUIRE
```
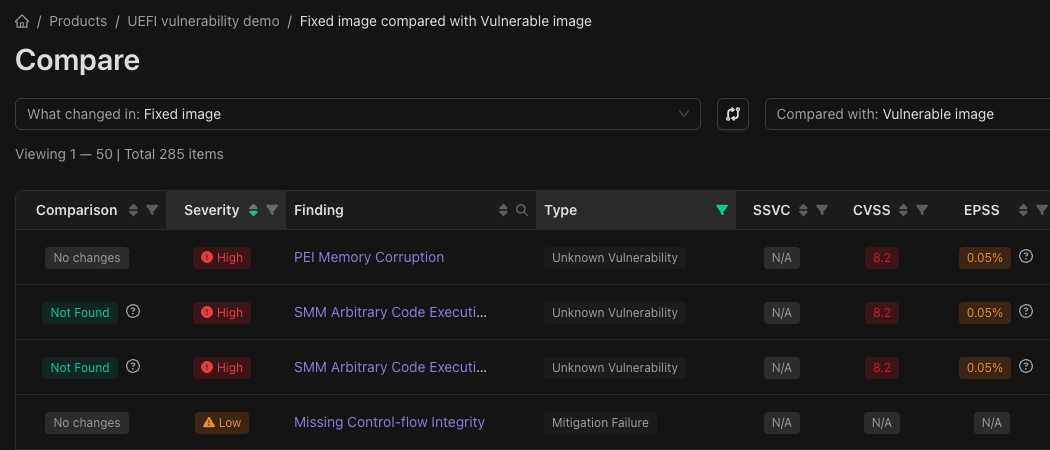
After uploading the fixed version and waiting for the scan to finish, we'll notice that this image has two issues less. We'll be using the image comparison function to verify the two SMM vulnerabilities are gone. To do this, select the checkboxes left of the vulnerable and fixed images, then click the Compare button at the top of the section.
The chat window has one suggestion to analyze the vulnerable code, so we'll go with that one. AI assistant will reply with a description of the vulnerability contextualized by the decompiled code as well as a detailed breakdown of how to fix the issue. It correctly points out that using Boot Services in SMM is dangerous and that we should replace them with the SMM-equivalents provided by the `EFI_SMM_SYSTEM_TABLE`. AI assistant will produce a fixed variant of the decompiled code (see below).
```c theme={null}
EFI_STATUS
EFIAPI
ExampleSmmStoreHandler(IN EFI_HANDLE DispatchHandle,
IN CONST VOID *Context OPTIONAL,
IN OUT VOID *CommBuffer OPTIONAL,
IN OUT UINTN *CommBufferSize OPTIONAL) {
EFI_STATUS Status;
//
// If input is invalid, stop processing this SMI
//
if ((CommBuffer == NULL) || (CommBufferSize == NULL) || (*CommBufferSize == 0)) {
return EFI_SUCCESS;
}
if (gBuffer) {
Status = gBS->FreePool(gBuffer); // [!code --]
Status = gSmst->MmFreePool(gBuffer); // [!code ++]
if (EFI_ERROR(Status)) {
DebugPrint(DEBUG_INFO, "Failed to free buffer\n");
return Status;
}
gBuffer = NULL;
}
Status = gBS->AllocatePool(EfiBootServicesData, *CommBufferSize, (VOID *)&gBuffer); // [!code --]
Status = gSmst->MmAllocatePool(EfiBootServicesData, *CommBufferSize, (VOID *)&gBuffer); // [!code ++]
if (EFI_ERROR(Status)) {
DebugPrint(DEBUG_INFO, "Failed to allocate buffer\n");
return Status;
}
CopyMem(gBuffer, CommBuffer, *CommBufferSize);
return EFI_SUCCESS;
}
```
We can now go back to the driver and apply the fix AI assistant created for us. In `ExampleSmmStore.c` we're going to replace the usage of `gBS` with `gSmst` in lines 53 and 62. In the newest version of Tianocore these functions got unified under the MM framework and make use of the new function names `MmFreePool` and `MmAllocatePool`. Now we need to recompile the fixed code with the following snippet.
```bash theme={null}
build -p OvmfPkg/OvmfPkgX64.dsc -a X64 -t CLANGPDB -b DEBUG -D SMM_REQUIRE
```
After uploading the fixed version and waiting for the scan to finish, we'll notice that this image has two issues less. We'll be using the image comparison function to verify the two SMM vulnerabilities are gone. To do this, select the checkboxes left of the vulnerable and fixed images, then click the Compare button at the top of the section.
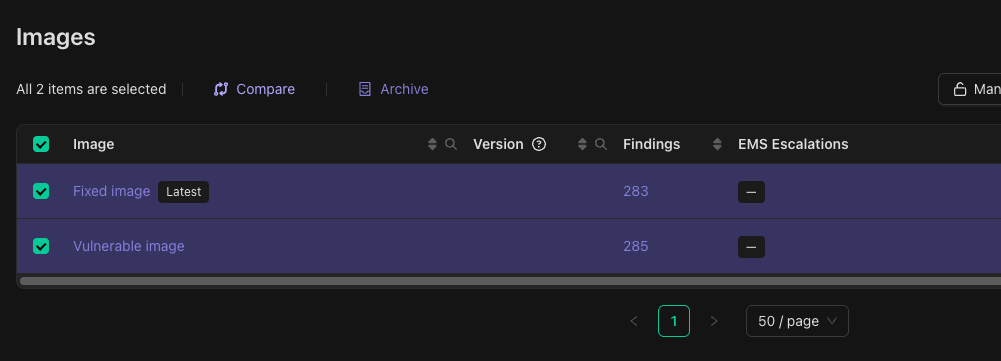 On the compare view, make sure the fixed image is on the right and the vulnerable image is on the left. If this is not the case, the comparison results will be inverted. To swap the right and left images, click the Swap button between both. Once the comparison direction is correct, we can see that both SMM Arbitrary Code Execution vulnerabilities are no longer found in the fixed image.